Wednesday, March 13, 2013

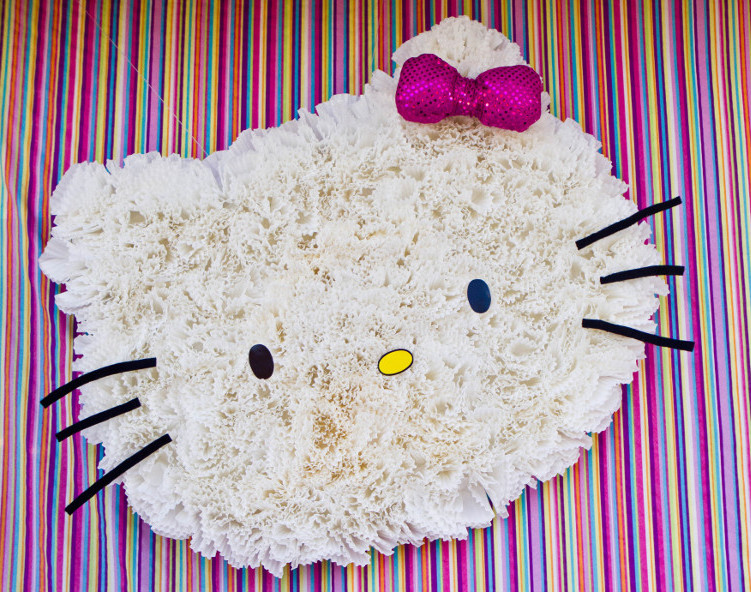
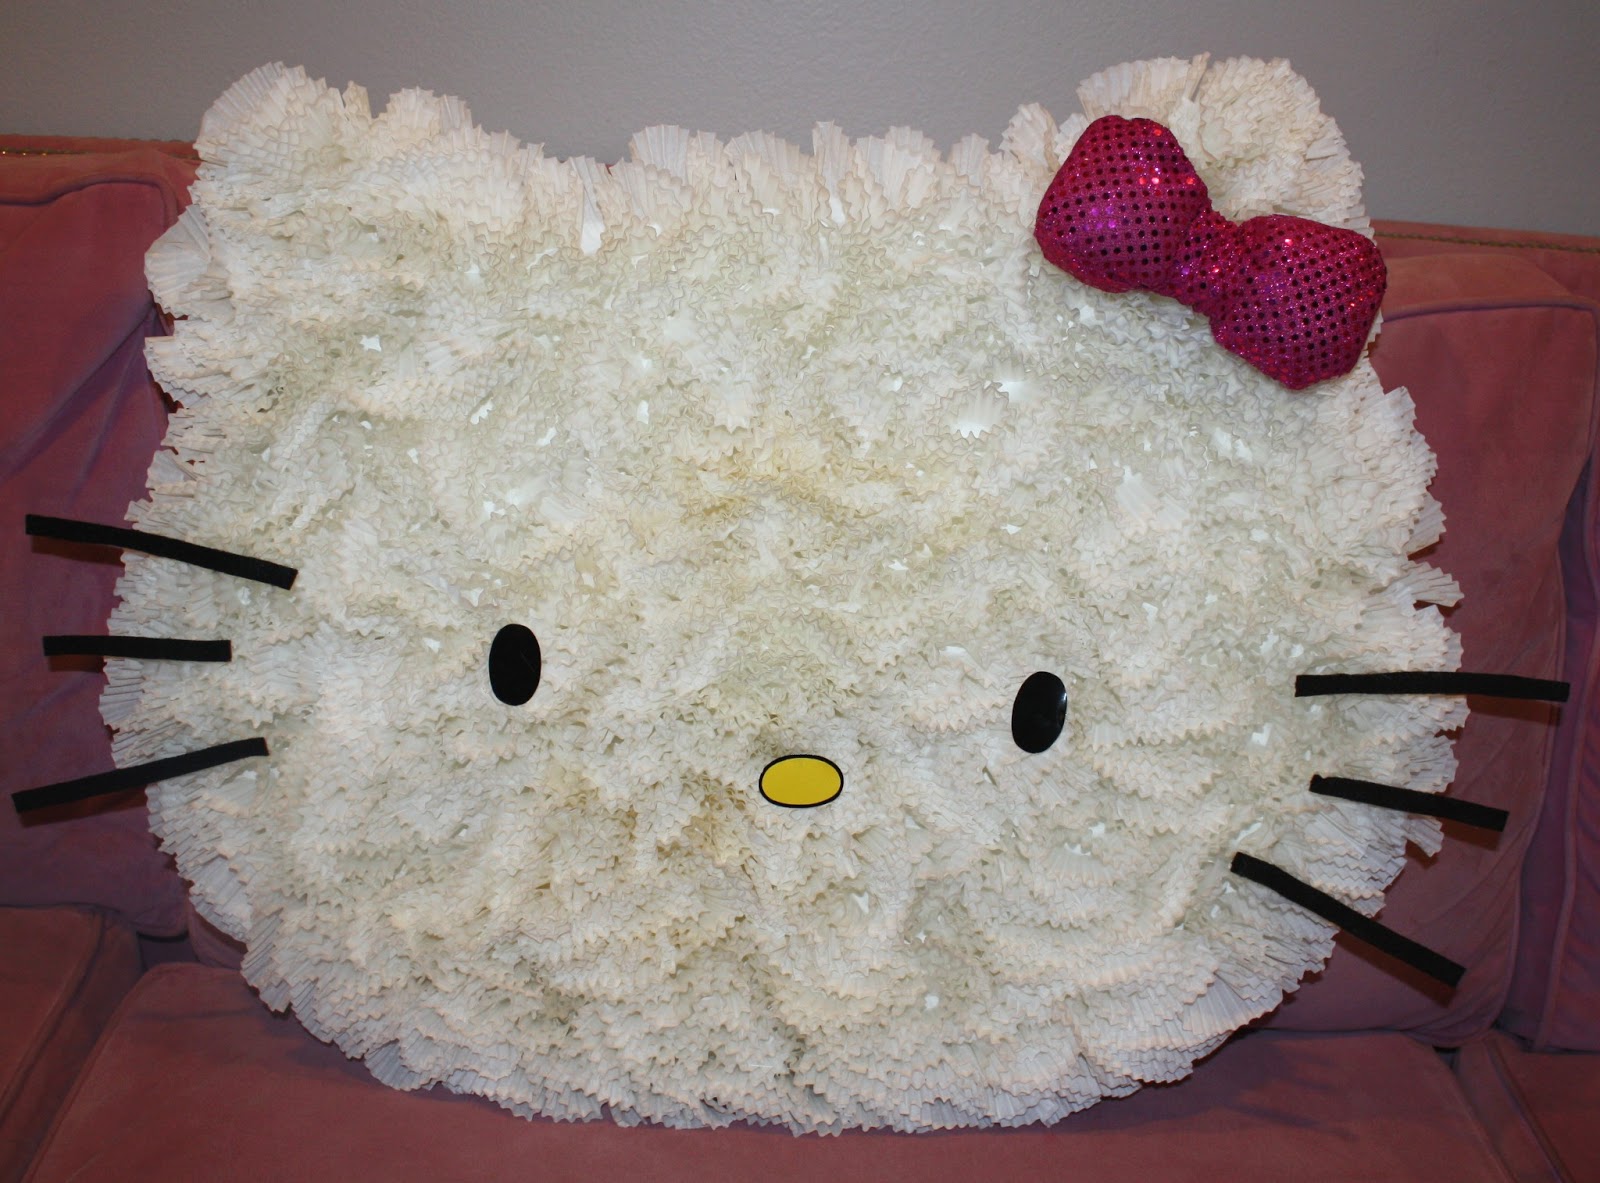
Making a Cupcake Liner Hello Kitty Backdrop: A MPM Tutorial

Ok party babes. I am going to attempt to walk you through a tutorial on this Cupcake Liner Hello Kitty. Bear with, it's my first. This is an original idea by Miss Party Mom, at least to my knowledge it is! When I added up all of the costs, it was about $15 to make- unless you don't have a lot of the tools (gasp!) like a hot glue gun, X-Acto Knife, etc. In that instance, what are you waiting for?! Run out and get them asap! No crafting woman should be without! 

What You Will Need:
- An image of Hello Kitty (just Google Image it)
- 1 piece of white poster board
- Double Stick Tape
- Hot Glue Gun and a full pack of hot glue sticks
- A roll of Craft Paper
- Black and Yellow Construction Paper (I got a shiny kind from the scrapbook isle)
- 5 packs of LARGE cupcake liners (also known as baking cups- found at any craft store or Walmart for $1.50 a pack)
 *You can also use coffee filters if you're in a time crunch, it just won't look as condensed*
- Scissors
- Marker
- X-acto Knife
- 1 piece of Glittery Pink/Red Scrapbook Card Stock OR  1/8" yard of Glittery Pink/Red fabric for the bow
- A small amount (2 hand fulls max) of Batting
- Black Pipe Cleaners
- 1 piece of Black Felt
- Fishing Line
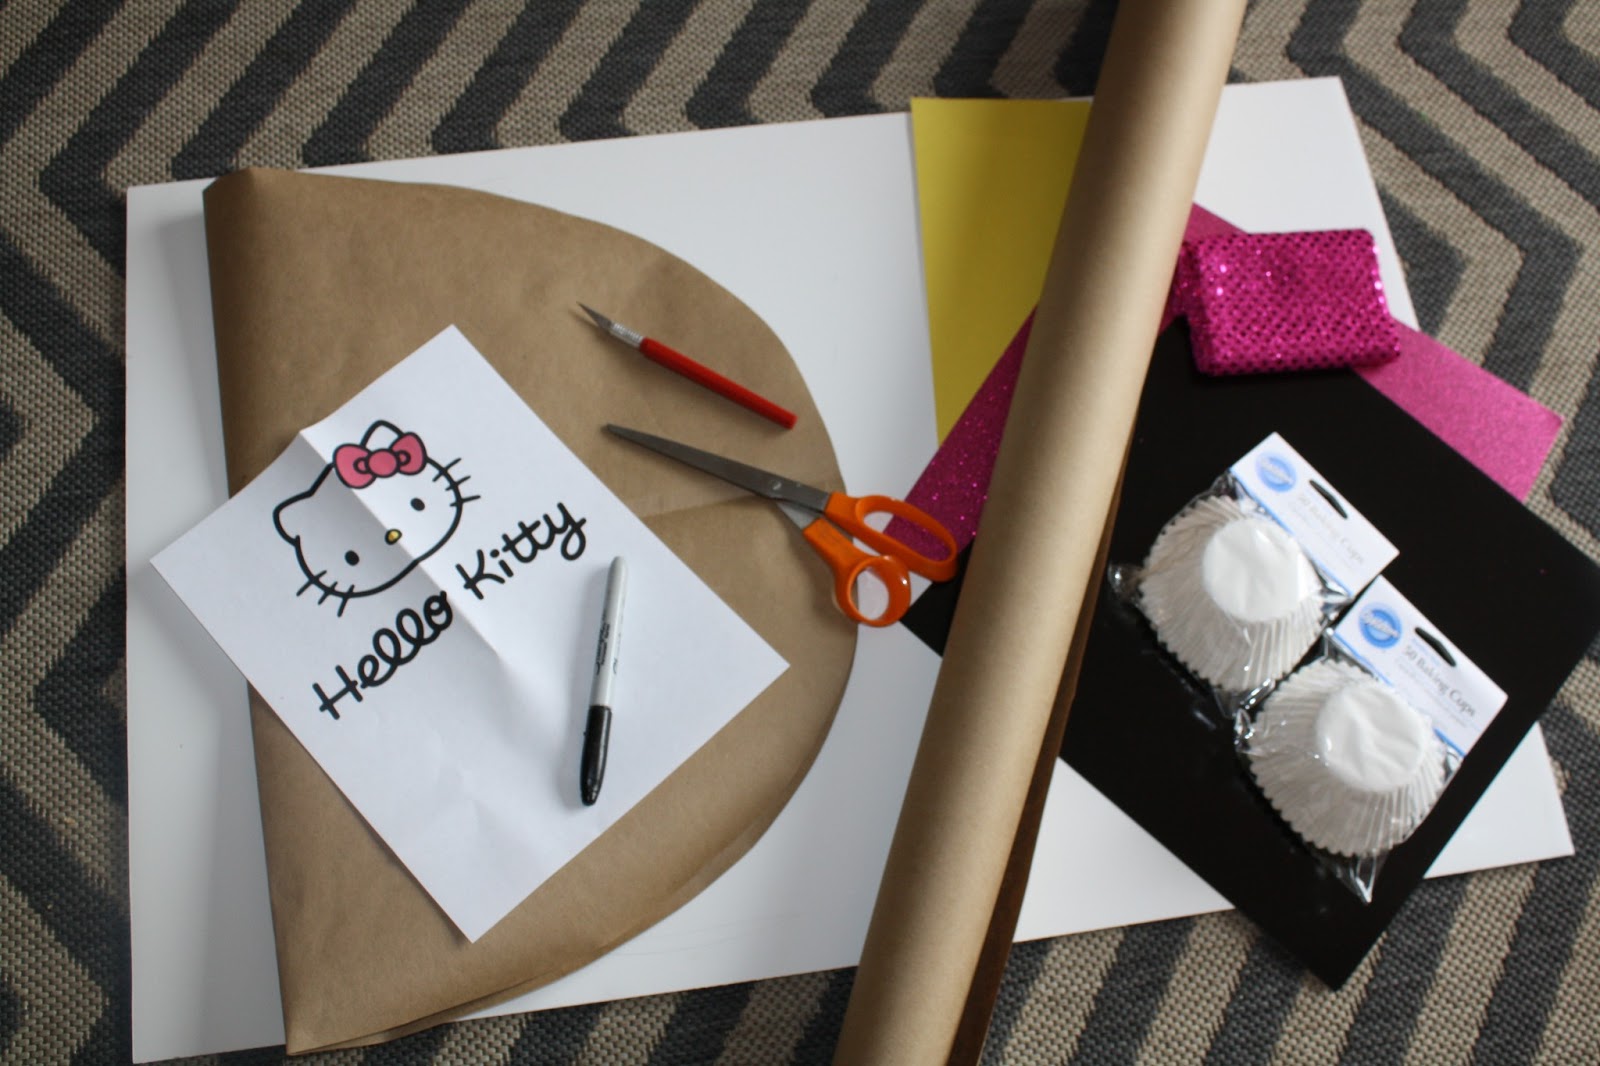

1.)  Creating a face stencil... Start by folding in half a piece of craft paper that's a little bigger than the poster board. Trace a half oval as big as the size of poster board will allow (I marked the poster board size on my craft paper at both the height and width to help me see how big I could go.) Cut it out in half so that it's symmetrical of both sides.


2.) Cutting the face out... Double Stick Tape the HK face stencil you've just created to the poster board and use a marker to trace it on. With a new blade on your X-Acto knife, cut it out carefully watching to not cut off your thumb- it happens, trust me. The cut doesn't need to be exactly perfect because the edges will eventually be totally covered with muffin tins.


3.) Making the ear stencils... There will be 4 corners of  poster board left over to create the ears- you will only need 2 of them (the bigger ones if there is a difference). Again use your craft paper to stencil out the ears. I am NOT an artist and I did about 4 different ear stencils until I got the right size and  shape. Again stencil these on to the poster board and cut out with your X-Acto.


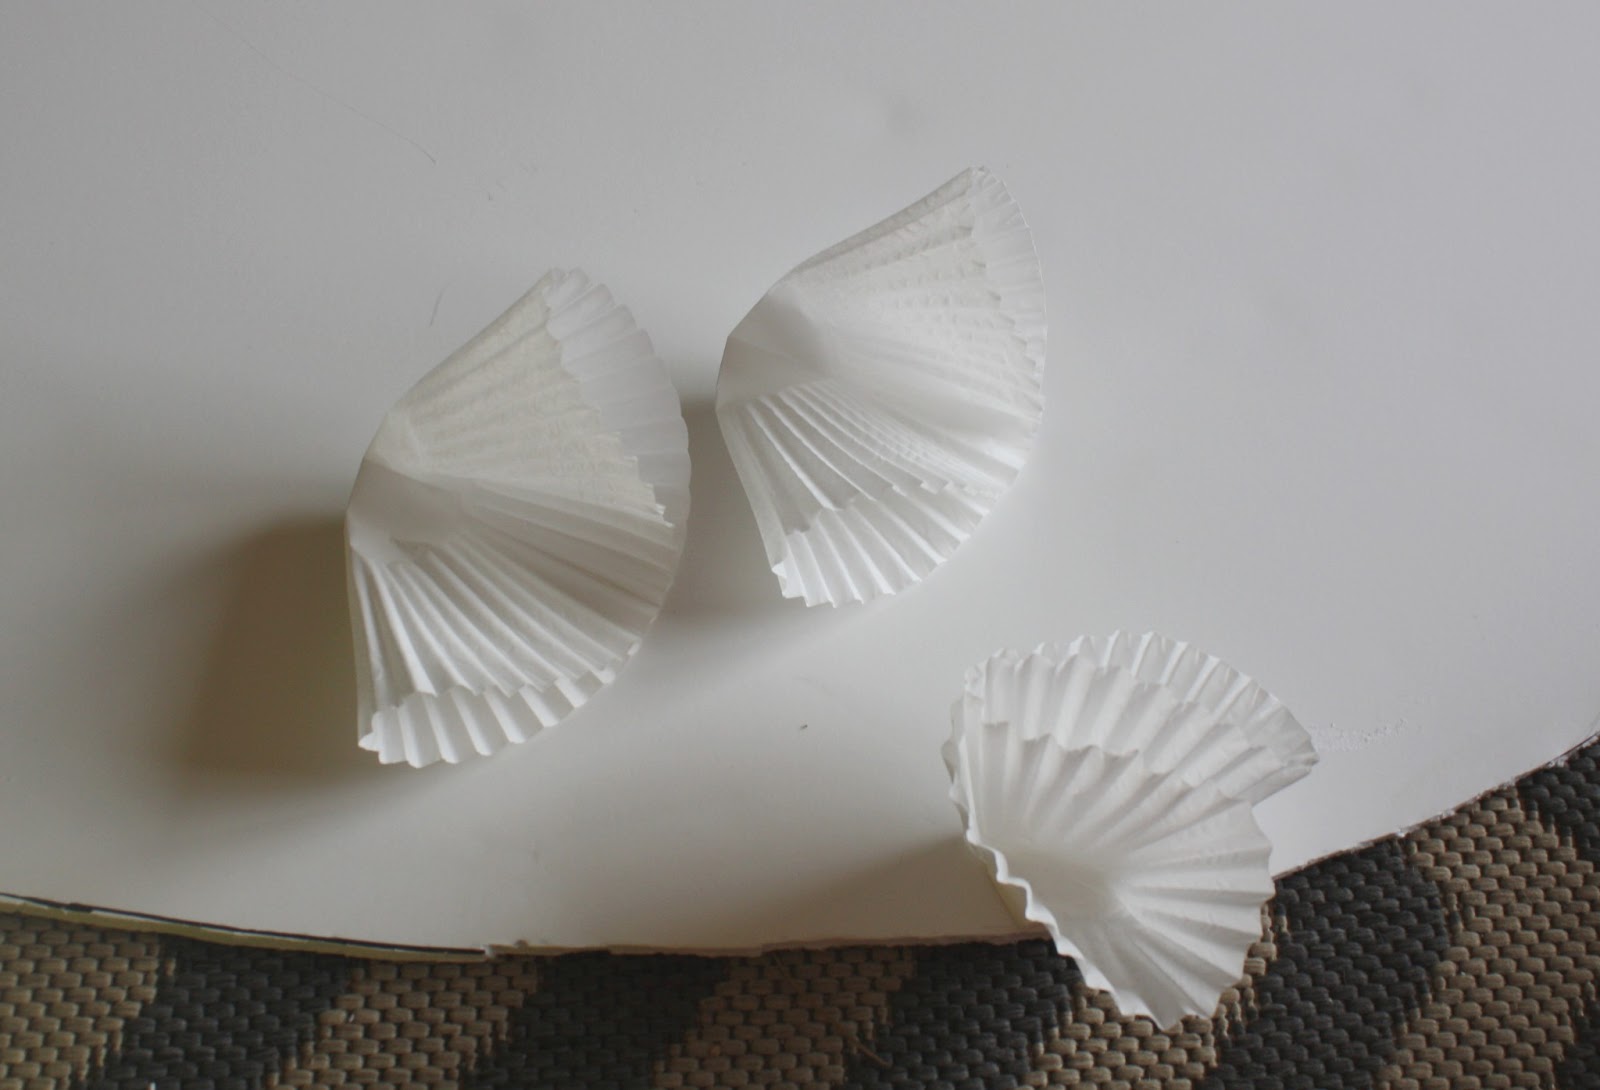
4.) Ear placement... This is rather important in order for it to look the most like HK. So use regular tape to attach the ears to the back before committing with the glue gun. Make sure they have the same cut as where they're going on the head so that you can attach them seamlessly to the head without gluing them to the front or back of the face. It's better if it's one flat surface- see this pic.


5.) Let's give her a face... One question!? Are you ready to potentially lose your mind due to some very tedious work?! Let's get to work then! Here are a few notes before we get started... {{helpful hint, do this project without toddlers since the tins are delicate- you might want to put in a movie or watch a marathon of your fave show to pass the time!}} 

#1: If you don't have at least 3 hours to commit to this part but still want to make it- you'll want to go the coffee filter route. I'm thinking you'll need about 200 filters, so probably 2 packs. They are bigger so they cover more space so it will probably take 1/2 the time. #2, I chose to fold each tin in 4 for this project BUT you can also choose to not fold them at all and glue the bottoms of the tins down on all over the entire face and ears and then fill each tin in with a folded (in 4) tin right in the middle of the full tin. I've done this with the "90" I'm picturing and it goes a bit quicker but gives a slightly different look. I was going for total coverage with the HK so the way I chose was I folded each liner in 4 and while it was still on my fingers I put the hot glue on the bottom and pushed it down. I did the entire outer edge, then moved to the center and went out to the edges again so that the tins were not leaning in one certain direction.



4.) Eye & Nose Stencils... Hours later when you're ready to kill me is when we're ready for the next step... Yippeeee! Take your craft paper and again make an eye stencil by folding a small piece of it in half and drawing a small oval to create the eyes and nose- they will all be the same shape. My oval measured about 1 & 3/4" wide x 1" tall. Stencil it on to the black paper and cut 2 out for the eyes. Do the same thing with the yellow for the nose. I was able to create the outer black edge of the nose freehand once I had the yellow glue sticked down to it, but if you don't have a steady scissors hand then create the same stencil slightly bigger by 1/16".

5.) It's BOW TIME! You can do your bow 2 ways. I chose to use fabric, but if you're better with paper then use some fun shimmer/glitter or sequin paper to make it special. If you do go the paper route, I'm sure you can Google Image the "Hello Kitty Bow" and scale it to size for the perfect stencil. For the fabric bow this is what I did- it involves your fingers and hot glue... so if you're sensitive to hot glue, use paper. Or if you're good at sewing, I'm sure you could sew one. (The "Party Cave" is so crammed right now I can't even get to my machine, which is why I chose to hot glue it!)

Start by cutting off 2" from the end of the strip of fabric, this piece will be used for the center. I folded the long edges over and hot glued them as if to "hem" them and then set that piece aside. Next, take the rest of your fabric and fold it so that both ends meet in the middle. Put a line of hot glue under each end and "scrunch" them together. It doesn't have to look perfect because it will be covered with the center strip of fabric you set aside. Once you have both sides scrunched, stuff them with batting. Now place hot glue on the open edges of the bow where batting is sticking out and "seal" them closed.


Get rid of any sharp "un-Hello-Kitty-like-bow-lines" with more hot glue. Just push the sharp edges down and to the back where no one will see them so the bow is fully rounded off.


Place the strip in the center of the bow with hot glue and tighten it in the back until it looks right, then add more hot glue to fasten it down.

6.) On to The Whiskers... I was planning to use only black pipe cleaners... but after seeing how it looked I decided against it. I looked a little TOO artsy craftsy for me...but if you like it- go for it, it'll still look unmistakably like HK.

I decided to cover the pipe cleaners with strips of black felt. I just kind of cut them in to strips, remembering the middle whiskers are shorter than the outer ones. I cut 4 long ones and 2 shorter ones. Then I hot glued a strip down the back and laid the pipe cleaner straight down it.


6.) Attaching the eyes, nose, bow and whiskers... We're almost there! Get out that HK image again and be sure to study it. I worked on placing the features for a good 5 minutes before committing with hot glue. Her eyes should start in the middle to lower half of the face- this is where a lot of people mess her face up when drawing or doing anything artsy with her. The eye ovals go vertical while the nose goes horizontal. All very important! Attach the whiskers next, highest one at the top of the eye and spaced 1" apart from there... Her bow should be right in the middle of the right ear. If you wanted a bigger bow than the one I made, I'd suggest getting 1/4" yard of the fabric.

7.) CONRATS! You're done! If you want to hang it, use your X-Acto knife punch 2 small holes through the ears and then run some fishing line through and hang it for all to see! This would also make for some adorable room decor if you have a true Hello Kitty Fan on your hands!

xo Party or Die xo
kenna


Monday, March 11, 2013

The Top 10 Party Trends I Don't Want to See Anymore

Trust me. I am in no position in the party industry to be writing this post, I have been blogging all of a month...? It is so overly presumptuous of me I keep trying to stop my hands from typing- but I can't. And this post isn't for everyone so give me a moment to clarify. If you're a mellow party planner who stumbled across this blog post- this is not for you. My hat is off to you if you're ordering some Costco pizzas and having a few kids over for a non-themed sleepover. I am writing this for people who LOVE planning parties, mostly moms like myself who are crazy party people (oh- admit it already, at least it's not quilting...yet...) who love making every party over the top and better than the last. This post's for you babe.

This all started when I came across this adorable blog called One Stylish Party and I read her Trend Forecast for 2013. It was dead on- seriously, she nailed it. And I was kind of bummed she nailed it because I was planning to put together something very similar...(well, not nearly as cute) but just the brass tacks of what I've been seeing in party trends for 2013. And sure, I still could...but it got me thinking. What party trends are DONE? What am I seriously SO sick of seeing? Now brace yourself, you ARE most likely going to disagree with me (up to 99.9% of you maybe?) so then, why can't I stop typing?! Just bear with me, please? You see, I really DO have a background in trend forecasting... I am not even sure how to prove this, call my last big employer? I worked in an industry for 5 years (read here for more) where we made trend boards daily and just trust me, I know when trends are over or on there way out, tomorrow.

One last plug before you leave me... anything that gets done 5,000 different ways is just that- done. The people have seen it. If you're an aspiring party planner, like myself- it is in my opinion, important to set yourself apart with unique themes, color palettes and if it's a dessert table: unique desserts. So... having said that...

The Top 10 Party Trends I Either Want To See WAY Less of...or Not At All in 2013...

1. The Little Man/ Little Mister Party or Boy Baby Shower. If I see one more mustache on a toddler I'm gonna ralph. We've been celebrating the mustache craze since 2010. It's been 3 years people. Let's move on. (Move it on to the bow tie if you love the "Little Mister" idea so much, also give it a new name?). LOTS of cute bow tie party ideas out there right now. If you have a party where the character LITERALLY has a mustache, ex: Mario or Captian Hook- then hey! mustache it up! Otherwise. Stop. There are obviously a couple exceptions to any dead trend...one of them lies in this amazingly well done Little Mister party by Lux Events. Anything done this well escapes all judgement. Other than this please see the Bow Tie party below it and take a hint.


                           Super delish looking Bow Tie Party below party by My Sweet & Saucy


2. The Rainbow Layer Cake. It's done. Move on. At least do it in pastels, ombre, black and white- whatever...a new twist makes it (almost) totally new again. Put it in a push pop for goodness sakes, I just did and anything "mini" becomes new again. Just please change it up.


3. The HERSHEY Bar Gender Reveal Party Favor. It was crazy clever, I know it. And then Pinterest got it and everyone did it in one month. Which is fine- you got in before it got killed. But now it's dead, so leave it alone. Plenty of other Gender Reveal ideas... I'll be showing off some on this blog at the end of March.


4. Apothocary Jars. Oh dear, I've gone too far. I know, you're getting mad. "My JARS??!" you're thinking... maybe you even just yelled out, "But I just bought a set, and they were $70!" Hear me out. They were classy. They were quaint. They were even hard to find. Now they're at Ross, Target, Michael's and Walmart. Whenever I see a party trend at ALL of the mass retailers, I've officially moved on. Now I'm not saying I'll never use them, because I will from time to time. But use them on a party theme that fits. Easter party? Check! Tea Party? Check! Every party you ever throw does not need 3 jars at different heights filled with pink and blue shiny gumballs. You can do better. There are so many jars, vases, mugs, etc. that you can fill with sweets. Find something that will set you apart, that is always my goal (in life too, actually).

5. Paper (ehhhhhh...) Straws (ahhhhhh!)
NO. Take it back. Ok, I do. No I don't. Ahhh, I'm so confused! Ok, let's compromise. Paper straws are totally adorbs. I use them a ton and I love them. They go with plenty of party themes. But a Construction Party they do NOT go with, (unless it's these Birch wood paper straws by Kikkerland?!) So do you get it? Any twist on the normal striped straw- totally ok: Floral straws? Polka Dots? Hearts? Chevron? (But oh, chevron, you're not so safe yet- we'll get to you....) ALL adorable new ways of keeping a great party idea around and not burning it out. One last paper straw note- NO more naked straws. It's almost offensive to see a missed opportunity on a paper straw- esp. if it's a plain striped one. Lots of cute ideas for dressing up straws (flags, ribbons, glitter foam stickers), I even recently saw straw tassels and mini cupcakes shoved through and used this idea in our St. Patty's Day shoot.


6. The Half Backdrop/ Un-Ironed Linens and Plastic Table Clothes. These are not necessarily trends, quite the opposite- I just NEED to address them. Let's start with backdrops... Trust me, when it comes to backdrops I have made some HUGE mistakes and I'm a repeat offender... I'm learning with every party- it's probably been my very biggest learning curve. The backdrop that is a sheet of wood or foam core covered in fabric or wrapping paper set behind a table (been there, done that) well, let me tell you something: it doesn't photograph well. Maybe for detail shots, but people want to see the whole table and from a full view- it looks like you're missing something if your backdrop is smaller than your (typically) 6 ft. table. It needs to be BIG (covering wide and tall enough so that when you or your photog steps back you can see a full view of your table and your backdrop isn't cutting shorter than the table). The shot is just awkward otherwise. Get a fully established collapsible backdrop that you can use behind every dessert table. Un-ironed Linens: Oh dear Lord, I JUST invested in a legit steamer, what the heck was I waiting for?! It takes SO much away from the table if you're starring at wrinkled linens in the photos. The detail shots of my husband's Grandmother's 90th were gorg, but in the full view- all I see are wrinkles and an awkward, too tall backdrop. I've learned from that table. End of story. Plastic Table Clothes: NO, NO, NO. I don't care that they're $1.00. Find a white linen 72" table cloth at Walmart for $10.99 and a fun table runner. The only time plastic is ok is if you're throwing a party at Chuck E Cheese.


7. Chevron. Ok, I have a chevron rug, I need to get that out of the way like asap. I like chevron, we've been good friends since 2011. I think it's a fun and modern design. But to see it in every party detail, let's get over that. No more entire large chevron print backdrops please- they're done. If you want a touch of chevron- try something more unique.... like maybe chevron baking cups or cookie bags?


8. Baker's Twine. It's cute. I can see its use. But just remember, there are a LOT of adorable ribbons out there. Just because the big party blogs are showing baker's twine tied around everything doesn't mean you need to tie your cookies and every other tie-able thing with it. I've never used it. I don't think I ever will. I am a real fan of different kinds of ribbons.

9. Washed Out Photography. Trust me- my eyes are 20/20. I'm good in the vision department. So then why can I hardly see most of the professional photography that's being taken of these amazing parties lately? It seems to be a trend. Well guess what, that trend sucks. I want to actually SEE your party details. Not some sun shining on your pennants to make them look artsy. I mostly see this is the whole Shabby Chic party themes...Oh no...here we go...

10. Shabby Chic Parties. Like with the Mister Man Party, I have seen only one exception in the last year of a perfectly done Shabby Chic party, but I'm sure there are plenty more because 5 out of 10 parties I seen on the party blogs are SC. Now ladies. Rachel Ashwell has had her 15 minutes. If you want something girly and pastel pink- try a cotton candy party for goodness sakes! (I totally just made that up and I want to do one). Themes are endless. Brainstorm it out. Here is my one exception for this theme by Fanciful Events... kind of a Carousel Shabby Chic rendition... that backdrop is simply amazing.


...and I didn't even mention Mason Jars, because you already knew that right? 
Now WHAT am I going to do with my 3 dozen... OHHH! How about: tint them, dip the rims in chocolate, glitter the sides, tie a big bow around them...do you get the gist?! Do it ALL differently. But don't do a mustache- like ever again. Unless you get paid $1,000 minimum- then it's totes ok.

Hope you don't hate me. And if you do, I'm just getting started... 

xo Party or Die xo
kenna

Saturday, March 9, 2013

Behind the Scenes at Miss Party Mom...(NOT what you're expecting, I promise)

I wanted to give a little behind-the-scenes on the St. Patty's shoot we just did here at Miss Party Mom (and pretty much every party we've done before as well- they all kind of look the same the week of). I write lots of cute write ups to send along to all the big party blogs but they have to be sweet and dripping with confection sugar and I wanted to, at some point, give the real truth about throwing a "professional" party. And I think the time has come! This is the raw sugar version.  For all of the crafts and other set up tips you will have to see the Pizzazzerie feature found here.

St. Patty's Party: I came up with the idea to have what would be my first "stylized shoot" 2 weeks before we did it. I contacted Hannah at Hannah's Cookies and Treats and asked her to start brainstorming cookie and cake ideas and then I contacted Christina at Moments Captured Photography and asked if she'd be able to shoot it. No matter how cute your party set up is, if you don't have a professional photographer- it's pretty much pointless. I know that's harsh but when I look back at the 1st Birthday Camping Party I did for a client and I think about how awesome that party was and that I took the pictures myself, I literally want to kick myself. It just didn't do it justice at all and after you've spent that much time on something- pictures of it are essential. The difference between those pics and the St. Patty's party are literally night and day. So if you can scrounge up some extra funds- invest in a photog- life long memories are at stake!

Ok, back to the St. Patty's shoot...so 2 weeks before I come up with this idea for a "Pot of Gold at the End of the Rainbow" party because, why not... I have entire rainbow theme in my party cave- plus a black "caldron" from my husband's 30th Halloween Party that would so make the perfect pot of gold- I mean, it would be foolish not to put these items to use! And because I already had SO many rainbow decorations from my daughter's 1st Rainbows & Birds Party I really only needed to focus on getting some touches of shamrock which the Dollar Tree was perfect for. To save money I used all free printables for my table graphics, which are pretty accessible for holiday parties- I just googled "free St. Patrick's Day printables" and a ton came up. You can find links to all of these in the Pizzazzerie article.

One of the things most people don't understand...maybe because no one lets on to it- (at least in my experience thus far) is that party planning is REALLY STRESSFUL. I am not at home baking away in the kitchen all week while my kids do floor puzzles. I am running around from Michael's Crafts to Joann's Fabrics, Walmart, Target- you name it. I spend so much time in the car during party week it's crazy. My kids are usually trying to craft every project rightalongsideme, which if you are a perfectionist like myself- will drive you insane. So- in order to craft without my little helpers, I'm waiting for naps and bedtimes- because, did I mention- we live 3 hours away from the Grandma's- so most help is paid help. At this point I'm not quite rich enough for a party week babysitter...but oh goodness, give me time!

So my days are spent with the kids, running party errands with bribes for trips to the park in between... brainstorming with my 4 year old in the car (he REALLY has ideas) taking notes and making little dessert table sketches. THEN at night I'm able to actually work and these are late nights full of late night teli!  Everything is still pretty mellow until TWO DAYS before the party which is when it turns to total and absolute chaos. I know there are party planners out there who are still making organic dinners and fitting in learning time...but oh Lord I am not one. My kids are lucky to be eating nuggets and cheesy broccoli and their learning time is full of mud pies and anything else outside that will keep them distracted. Some days I let our the chickens out for them to chase around just to exhaust them.

This time frame I'm speaking of is how Miss Party Mom got her name actually... my husband would say before every party I was throwing (pre-business), "Oh dear...it's Party Mom- she's baaack!" I actually quite thought of myself as a super hero of sorts, "PARTY MOOOOM!"... however, I don't think that is what he had in mind... in "party mom" mode the kitchen turns in to a mass of flour and cake ingredients, the laundry piles high and there's NEVER toilet paper stocked...or milk if I'm being honest. Or anything normal moms keep on hand. But I think my kids have grown to kind of like party week, they know it's mud pie time and that William and Kadence (Hannah's boys) will pretty much be living at our house.

THE DAY OF the party. Oh dear, should I even go here?! The day of the party makes the day before the party look mellow. I am first of all, most likely on 4 hours of sleep which is never a good way to start a day. Somehow my kids usually convince me they need to eat all of the bad batches of cupcakes which obviously makes them nuts. At the St. Patty's shoot my son and Kadence actually started throwing a stuffed horse back and forth ABOVE THE FULLY SET DESSERT TABLE! When said horse fell, it luckily for me fell on to the coloring book buckets and I almost lost it. Ok, I did lose it, that's a total lie. It's times like this, sayings like, "it's only cupcakes!" literally do not compute in my brain. Those cupcakes might as well have been for Martha Stewart herself, that's how attached to them I'd gotten.

Even at a stylized shoot we're on a time frame, which I never actually realized until we just did this first one. I always thought of them as the "easy way to throw a good party" but because I had a photog coming at a certain time and my son's neighborhood friends were coming before Awana all dressed in green...I really had to be done by 4pm. Unlike a real party where food and 50 people come- it's maybe not AS stressful but it's still there- that party day stress is totally still there. And somehow nothing goes as planned and it truly never does.

Two hours before the scheduled outdoor shoot- it decides to rain. Lord help me. Hannah and Christina kept asking about my "back up plan." "What back up plan?" I asked, "It's only a 30% chance of rain!" Then 30 turned to 100. What happened to my Irish Luck... So in to the mouth of the open garage we moved- and you know what? I honestly think it turned out to be a better overall set up. I was originally planning to use the rainbow table cloth as the canopy, (it's intended use) and since the canopy wouldn't fit inside the garage I turned it in to the table cloth and pulled out my photo backdrop set up so I could still use my turquoise sheet and clouds idea for the background of the table. The canopy as a table cloth (how had I never thought of this?!) was such a better idea that my initial green linen table cloth and rainbow runner... it just pops beautifully if you ask me. Once the kids and parents arrived, and the party was all photograped, which took about 30 mins (with the kids going nuts because they SO badly wanted to raid that table, wouldn't you?!), I actually got to enjoy a party...and although I looked like death (did I mention there's NO time for showers or proper makeup before the party) it was great to relax and mingle with a few friends. I hope they've forgiven me for the no makeup.

So, there you have it. This job is not for everyone, it's full of chaos and last minute changes and cupcake laden children. There's a large amount of coffee, Red Bull and Diet Coke involved...maybe it's not the proper job for me (a natural born work-a-holic) but then WHY do I love it so much?! To finish a party is like birthing a child... with out all the diaper changes. There's such accomplishment. And I know not everyone gets it. And I'm totally ok with that. Because I do.

                                                                   xo Party or Die xo
                                                                             kenna


Thursday, March 7, 2013

1,000 FB Fan Giveaway!!

As a thank you to my fans for getting me to 1,000 before I could even hit my 1 year anniversary of being in business I am running this fun giveaway! The winner will receive 2 handmade (by me!) party decor items. As you know Miss Party Mom is all about a custom theme and I want you to be able to enjoy a touch of MPM at your next party- even if you're across the country-- or even the world! 

The winner will let me know the theme of their next party and I will make them, within 2 weeks, a custom made pennant flag banner (or fabric scraps banner) as well as a matching table runner for a 6 ft. (or smaller) dessert table. I'm attaching some pics of some pennants I've made to give you some inspiration! I have been blessed to have 2 awesome ladies helping me at MPM with baking and photography and so as a part of this giveaway I am thanking them with a couple of "liked pages" entry shout outs! Show these girls some love, they are both talented as all goodness and they put up with me on party day!! No- seriously- it's not easy. Ask my husband.
                                                                     
                                                                     xo Party or Die xo
                                                                               kenna


Friday, March 1, 2013

Apple-licious Giveaway

Welcome to the Great Apple-licious Giveaway
March 1 - 24, 2013 

I AM PARTNERING WITH AN AWESOME GROUP OF BLOGGERS, CRAFTERS AND PARTY PLANNERS FOR THIS IPAD AND IPAD MINI GIVE AWAY...WHY WOULDN'T YOU ENTER?!

3 WINNERS!!! 3 AWESOME PRIZES!!!

First Place - 34GB iPad
Second Place - 16GB iPad Mini
Third Place - 16GB iPad Mini
Open Worldwide
ELIGIBILITY:
Contest is open worldwide from March 1 to 24, 2013. All entrants must be at least 18 years of age.
Winners will be selected randomly via Rafflecopter. The odds of winning are dependent on the number of people entering. Should the winning entrant(s) not respond within 48 hours of being emailed, another winner(s) will be selected. Please ensure spaceshipsandlaserbeams@gmail.com is on your safe email list. We would hate to have to redraw another winner!
The winner(s) have the option of selecting an Apple giftcard or PayPal funds in lieu of receiving their prize. This option will be awarded as follows: first place $603.43 USD, second and third place: $340.22 USD

DISCLOSURE:
This blog was not compensated for being part of the giveaway and all opinions are our own. The prizes will be shipped by Spaceships and Laser Beams, we are not responsible. This event is in no way associated with Facebook, Twitter, Pinterest or any other social media network.  If you have any questions about the giveaway you can contact Stephanie from Spaceships and Laser Beams at spaceshipsandlaserbeams [at] gmail [dot] com. Good Luck!
GIVEAWAY SPONSORS:
The following blogs and businesses have joined together to bring you The Great Apple-licious Giveaway:
Spaceships and Laser BeamsThis Little MamaMimi's Dollhouse , A Sweet Spot: HomePretty My PartyDimplePrintsParty Plan-It DesignsProject:Party PerfectParty Printables Saving by DesignI'm With CupcakePrint The PartySweet Eats CakesBe SweetLivingston's House {full} of BOYSStunning PartyPaperCandee Squared Party PrintablesBellaGrey DesignsWhimsically DetailedCreative JuiceOhSoPrintableSoiree Event DesignHaute SugarMagnolia Creative CoParty Pants LLCNot Just A MommyI DO Invitations by MichellePartyTalesFlaired AffairsInkberry Cards + DesignMade by a Princess Parties in StyleYumtasticsGemini VintageCreative Designs by Toni Itsy BelleAutumn Lynn's Chocolate Sins NBrynnMy Paper Pinwheel Marie Louise Candy Buffets and EventsCapes & CrownsTwo Blonde Chicks Inc. Angelina's Dream PartiesPainting Paris PinkVanessa Grant EventsRibbon Revelry Party On PurposeThe Inspired OccasionThree Little Monkeys StudioPaige Simple StudioThe Flair ExchangeGreen Beansie InkFrog Prince Paperie Sprinkled with PaperMy Garden PartyMiss Party MomOh goodie designsFeathered Nest BoutiqueCupcake Express Confetti & CakePaper and Style Co.Printable Parties to GoSuperchickland

ENTER HERE!
" "