

I know I promised this a while ago- so I'm sorry it took me a little longer than I was planning for it to. You see tutorials are so not what MPM is good at- they're totally for left brained people I've learned. I don't even possess the ability to hold a pen with my left hand- that's how un-left brained I am. Because of that I enlisted the help of my handy-man husband Shawn. He is ambidextrous brained, I'm sure of it. He's handier than Wilson from Home Improvement... and that's sayin' something... I guess I'm grateful after all for being poor that first year of marriage which caused Shawn to go get a job in construction so we could make ends meet... it's really paying off for the business now!
I was also going back and forth about whether or not Pinterest deserved to meet me for the first time sans makeup. But when I thought about redoing the "canopy photo shoot" (as in my husband holding a point and shoot camera) I decided that was straight crazy talk... that would 1) require me to actually put on makeup and 2) set up the flippin' canopy again. Neither of which I can be bothered with during party season.
One thing I am sure of is that not only do you benefit from this tutorial, I- the creator of it am going to majorly benefit. I swear to you I'm printing this damn thing out and laminating it because this canopy is actually very easy to put together when you have the directions for it and aren't just relying on your "memory" every time. I'm so glad I finally got around to doing this- major time saver for future MPM canopy set ups! You're welcome Hannah!
I came up with the idea for a canopy after seeing a ton of amazing canopies placed over dessert tables on Pinterest. They were all gorgeous and very well made. I wanted one to keep the sun off of a lot of my melt-able desserts in our non shaded backyard for my daughter's 1st birthday and also because- hello! they're cute. So I set out to beg my husband in to making me one the week of my 3rd ever party (an Ice Cream Shop I put together for a clients child's End-of-the-Year Party last June). "Baaa-aaaabe" I called to him, "I neeeeed some he-llllllp" (said in the most pathetic voice ever, trying hard to play the helpless wife- something I do NOT do often). I showed him photo after photo on Pinterest (by the way- husbands hate Pinterest- I'm pretty sure they all curse the day it was made). We decided that although the Pinterest canopies were gorgeous- most of them were built out of wood and not "collapsible" which I REALLY needed (have I mentioned the Party Cave is a tad bit small- and our garage, has um... cars in it?)
So Shawn came up with the idea for a take-apart PVC canopy which was the perfect solution. PVC is so durable and since I take these everywhere and bang them up pretty good- durable is what I needed. I can actually just take the entire thing apart and leave the pieces outside and wipe them down when I need them.
Shawn quoted me under $50 for the structure part of it which gave me another reason to be sold. He went to Home Depot and got all of the PVC piping, connector pieces and the cement mix. I went to the grocery store and got the cheapest possible cans of food I could find- in my case it was Hominy corn from Smart & Final at $2.23 each can. Large coffee cans would work too.
I'll try and answer any questions I can in the comments section- I'll even enlist the husband's help...
So let's see... Here's our list of needs...
1 handy man
1 & 1/4" PVC piping
1 bag of the cheapest cement mix you can find
4 large cans of corn, beans, ketchup, coffee- (whatever you can get for the cheapest)
Saw (and said handy man to help you saw?)
Measuring Tape
Pencil
White Spray Paint
Velcro Sticky Back Squares
1 Queen Size Sheet for the canopy (we'll get to that later...)
6 Yards of Fabric (3 in each color)


 |
| From left: PVC pieces cut to the following sizes: 2- 2", 2- 24", 2- 48", 4- 59" & 2- 78" NOT PICTURED: 4- 11" pieces (photo of them placed inside cans is below) |
 |
| Connector pieces: (left to right) 4: T-fittings, 4: 90 degree elbow fittings, 4: couplers. If you're picking this stuff up yourself (as in you're not making your husband do it), just print this pic and take it in to Home Depot and show a worker... (please ignore the fact that one piece is gold... I got desperate one day and needed that for a dessert table set up...) |
 |
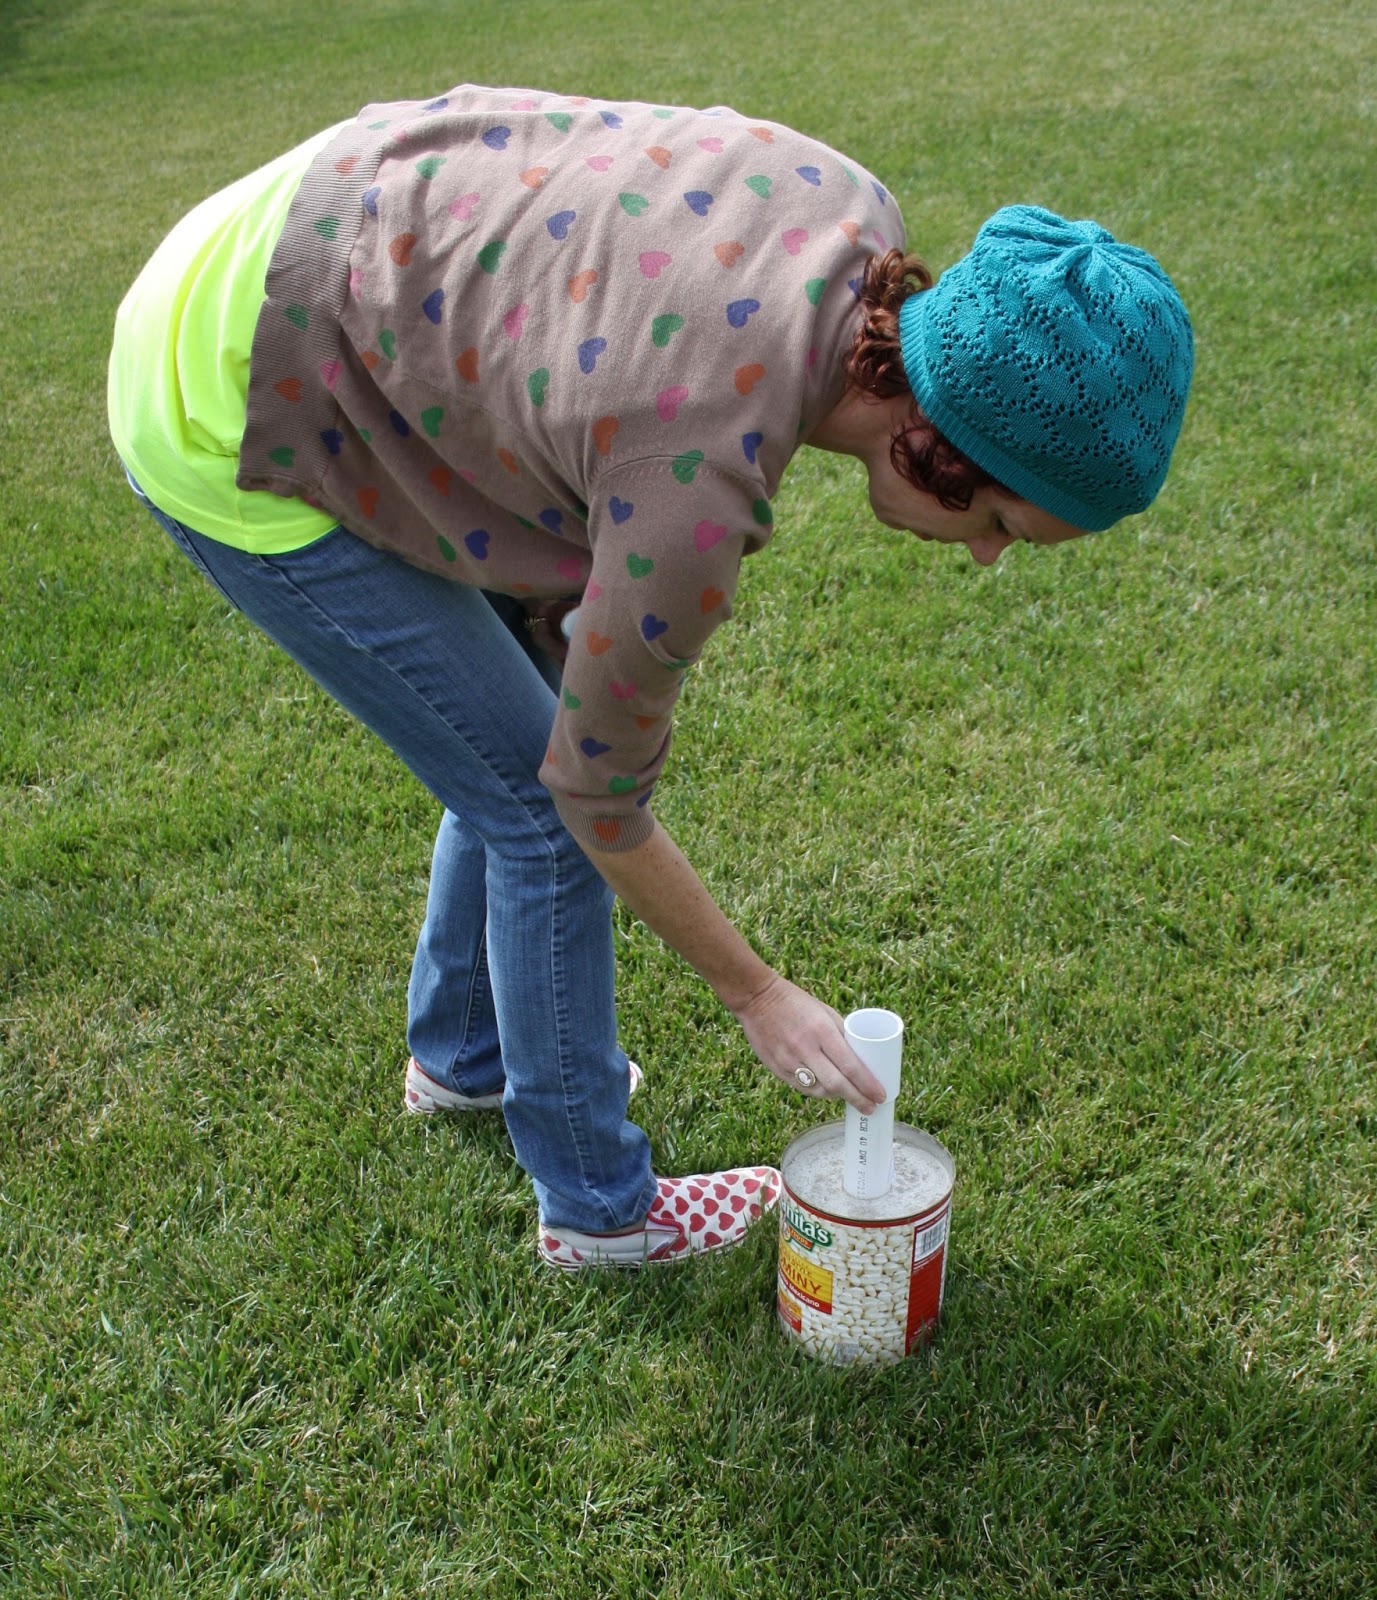
| Mix your cement mix and place an 11" piece in the middle of each of the four cans and push it all the way down to bottom. Tip: Wrap the cans in a matching wrapping paper to your party theme, they'll just blend in that way- instead of have people ask you what you made with the Hominy corn all day... |
 |
| Place the 4 corners... |
 |
| Insert the couplers... |

 |
| Place the four 59" PVC pieces inside of all 4 couplers... |
 |
| After all four 59" PVC pieces have been placed inside the couplers it should look like this. Please ignore our flamingos... this is what happens to your lawn when your husband is a youth pastor... |
 |
| Place the two T-fittings up and down like this... |
 |
| Place the two 48" PVC pieces inside the T-fittings on both the front and back.... please ignore my son picking his nose... |
 |
| Should look like this when looking at it from the front... |
 |
| Place two 2" PVC pieces on top of the two T-fittings in the front... |
 |
| Place the elbow onto the two 2" pieces (again on the front)... |
 |
| Place a 78" PVC across the front between the two elbows... |
 |
| Place the two 24" pieces at the top of the T-fitting in the back... |
 |
| And then an elbow at the top of that... |
 |
| Put the 78" across the top of that... |
 |
| Wow, we're getting somewhere! |
 |
| All you need is an hour or two, a couple tools and a little determination! Tip #1: When you get the entire thing together take your white spray paint and cover up the small black letters on the PVC with it. Tip #2: With a pencil add a small label to each of the pieces (ie: "front horizontal") so that the next time you go to put it together you will have a cheat sheet on top of the printed and laminated directions... other wise you might look something like this every time you attempt putting it together... 
"We've done this before- we can figure it out?"- Hannah
MAKING THE CANOPY:
I used 3 yards each in the 2 colors of
fabric- so 6 yards total. (I pieced fabric together on half of the stripes to create the right length in order to save on $ on yardage- if you don't want to have a seam in the middle or an extra step added to the project then you'll need 6 yards of each fabric, however the seam is up so high you cannot even see it so I wouldn't worry too much)
This isn't exactly hard to make but it is crazy tedious and time consuming and
might make you wish you never stumbled upon this tutorial... NOT TRUE- you love a good challenge, right?! The canopy is made of: 16- 6" wide x 86" long strips
sewn together (at a 1/2" seam allowance all around) and then backed with a queen
sized sheet (backed: as in sewn right sides together- leaving about a 10" opening so you can turn it inside out) Once you've turned it- it's time to sew the 10" opening closed and PRESS IT AGAIN. You will regret hanging it unpressed, I even have a photo to prove it!
If you *DO NOT SEW*, a fun printed quality queen size sheet would also do the trick. If you sew well enough to sew 2 sheets together (as in on top of each other) to create a little more sturdiness so it won't sag in the middle- even better. It might be a little bigger than you need but nothing that a few more Velcro squares can't hold down. You can also try looking for a large striped heavy weight fabric and just hemming the edges. The largest stripe I have found is a 3" wide black and white striped Ikea fabric (scroll down to see photo). These stripes below are 5" wide- so it's really just a matter of preference. BUT please hem it up nicely if you go the striped fabric route... Hem tape even?!"NO SEW" (no stripes) VERSION:   PUTTING THE CANOPY UP: The canopy should be attached to the PVC piping with Velcro squares which can be purchased just about anywhere (Walmart?) for about $5.00 a package. Apply a square to the upper back 78" PVC piece every few inches and then with someone's help holding the canopy up (so you can just focus on holding the edge) go along with the edge of the canopy and attach a square to it to match up with the squares placed on the PVC. Now pull the canopy to the front lower PVC and do the same at both of the front corners and on the corner of the canopy so you can again attach it- and a few along the front (78" PVC) but not too many- as you don't want it tuckering. Tip: I have also used packaging tape on the back part as well as fishing line and a needle to attach it to the front corners. While both of these work- I still find the Velcro squares are the easiest route.   
The lower back bar is the perfect place to attach your fabric backdrop... since we all know how I feel about a good backdrop! If you don't, you missed this post...

If you look closely you'll notice the Velcro squares on the front corners... Pull the canopy just the right amount of tight from corner to corner- if it's too tight it will create pulls in the front.
  This is what an un-ironed canopy that wasn't pulled tight enough looks like... I'm not proud. It was a hectic party week but it still kills me to do this day! For this one I used a plastic table cloth for the backdrop and hung sheer curtains over it (to disguise the plastic!) This is what an un-ironed canopy that wasn't pulled tight enough looks like... I'm not proud. It was a hectic party week but it still kills me to do this day! For this one I used a plastic table cloth for the backdrop and hung sheer curtains over it (to disguise the plastic!) .jpg)
Though time consuming to make, once you have a canopy they also make the perfect 6 foot dessert table tablecloth!

For this "fake scallop" I used doilies double stick taped to the inside of the canopy!

This is the Ikea fabric!
xo Party or Die xo
kenna
Reader Photos!
Have you made a canopy from this tutorial? If so- I ask that when featuring it on your own blog, or when submitting it to other blogs you give Miss Party Mom and this post credit, a simple link would be great- thank you in advance!
Please send any photos you'd like featured in this ever growing post to misspartymom@gmail.com and I'll add them in to continue to inspire others!

Reader Amanda Uriarte with her Carnival Booth
.jpeg)
Reader Sarah Washington's Concessions Stand

Fellow Party Planner TableTop Treats even used the canopy tutorial for her son's train themed 1st bday!
  Reader Lisa Camerato- lovely Under the Sea party! Reader Lisa Camerato- lovely Under the Sea party!
Are you ready for...
THE (EASY, ALMOST "NO-SEW") SCALLOPED-EDGE CANOPY...
YA YOU ARE!
Reader submission from Ami Sutaria
 
Thank you Ami Sutaria of Swell Cupcake for submitting this awesome tutorial for a Scalloped Canopy! How adorable is this canopy AND this party?
"We followed Miss Party Mom's instructions for the PVC pipe canopy, switching out empty paint cans (Ace Hardware sells them for $4.49 a piece) instead of the food cans for the cement. All of the rest of the steps are identical.
For the fabric I bought 6 yards of mint colored broadcloth from Hobby Lobby. I already had TWO white queen size bed sheets which was perfect, because you will need TWO for this "easy" version.
First, I cut seven stripes of mint fabric to 6" wide and 110" long. Then I placed them 6" apart on the first white sheet securing them with pins. Once I liked how the stripes looked, I adhered them to the sheet using fabric glue.... That's right- I did not sew them, I glued them. (If you sew, you can also sew them on!)
Next, I lined the BOTTOM white sheet up and sewed it together to the top STRIPED SHEET on three sides: right, left, and top. I left the bottom edge un-sewn (which will later become the front scallop of the canopy). The bottom was flattened out as nicely as possible and held together with pins.
After that I took a 6" bowl and drew a scallop edge on the bottom using a pencil. The bowl created a half moon shape on each stripe. I then sewed on top of that pencil line that I drew using the bowl. I did not flip to the inside and sew, I did it on the outside to save time and energy...
At first it was hard to sew a curve but the slower I went and more I did, the better the scallop looked. When I was done sewing the scallops, I placed Fray Check about 1/8" under the entire scalloped edge to prevent the soon-to-be raw edges from fraying. Once it was dry (iron it to speed the process) I used sharp fabric shears to cut away the remaining fabric as carefully and as in-line with the scallops as possible.
We assembled the PVC pipes as instructed in the original tutorial above from Miss Party Mom. Then I took the fabric and hung it on top of the pipes and secured it with velcro squares. As an FYI- this took about 20-30 minutes to accomplish.
Time to decorate! I took yellow streamers and wrapped it around the pipes from top to bottom and also around the paint cans securing with tape. I had some mint doilies from Michael's that I placed on top of the paint cans to hide the cement.
I had extra fabric leftover so I sewed the two together and hung it as a backdrop, it was hung with velcro squares. That's it! I think it turned out pretty cute and everyone had a blast at our ice cream birthday party!
I have also posted the party photos and other details on my blog: http://swellcupcake.com/
Thank you!
Ami Suteria
Swell Cupcake
|
