
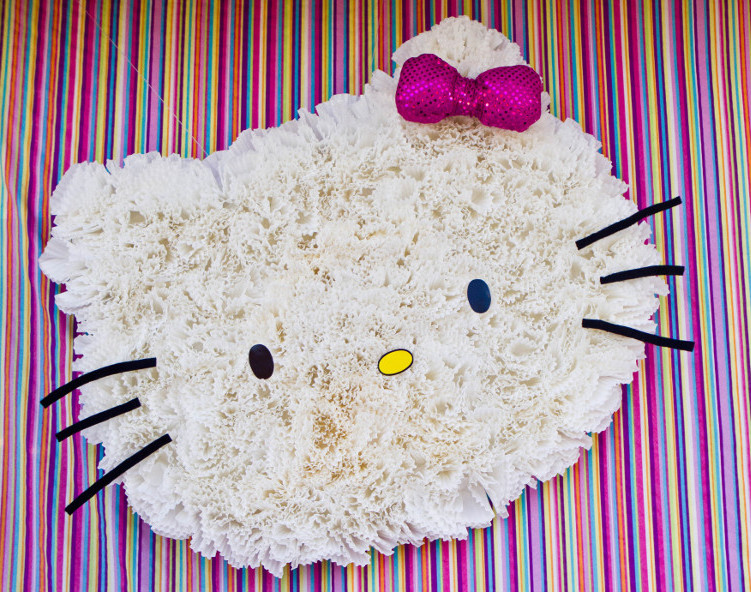
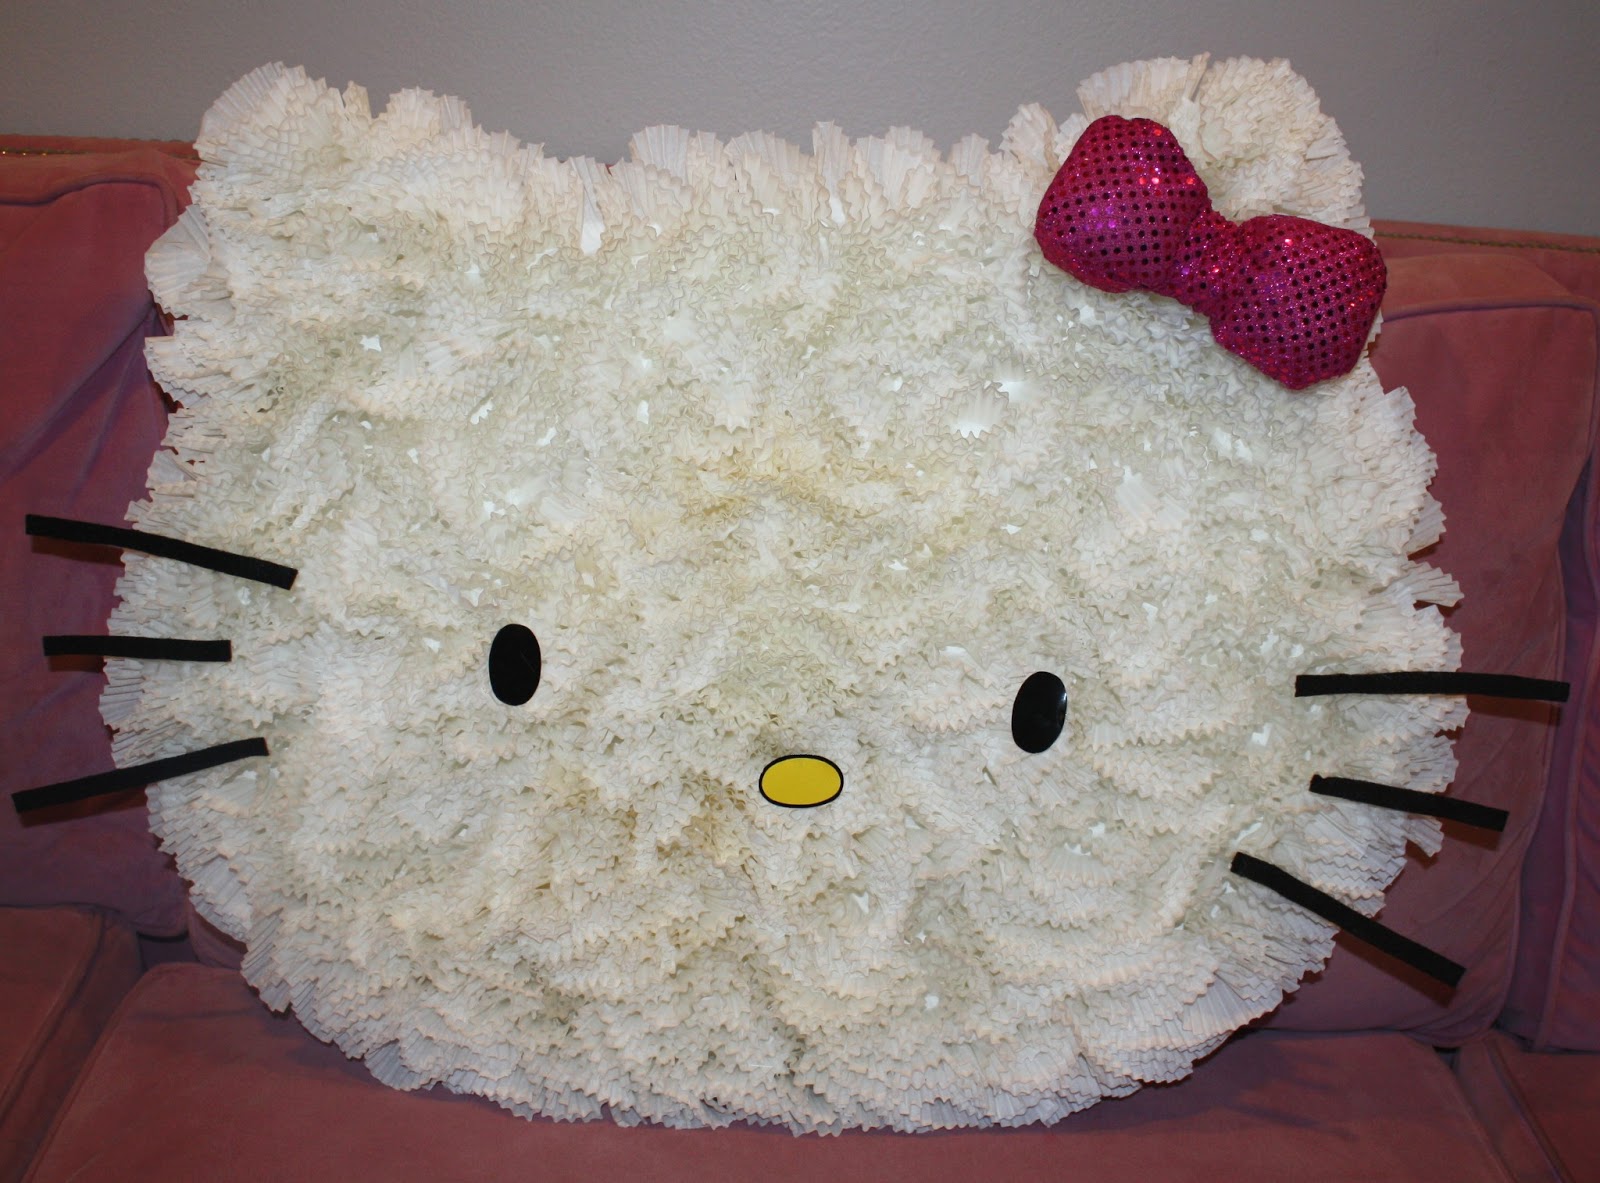
Ok party babes. I am going to attempt to walk you through a tutorial on this Cupcake Liner Hello Kitty. Bear with, it's my first. This is an original idea by Miss Party Mom, at least to my knowledge it is! When I added up all of the costs, it was about $15 to make- unless you don't have a lot of the tools (gasp!) like a hot glue gun, X-Acto Knife, etc. In that instance, what are you waiting for?! Run out and get them asap! No crafting woman should be without!
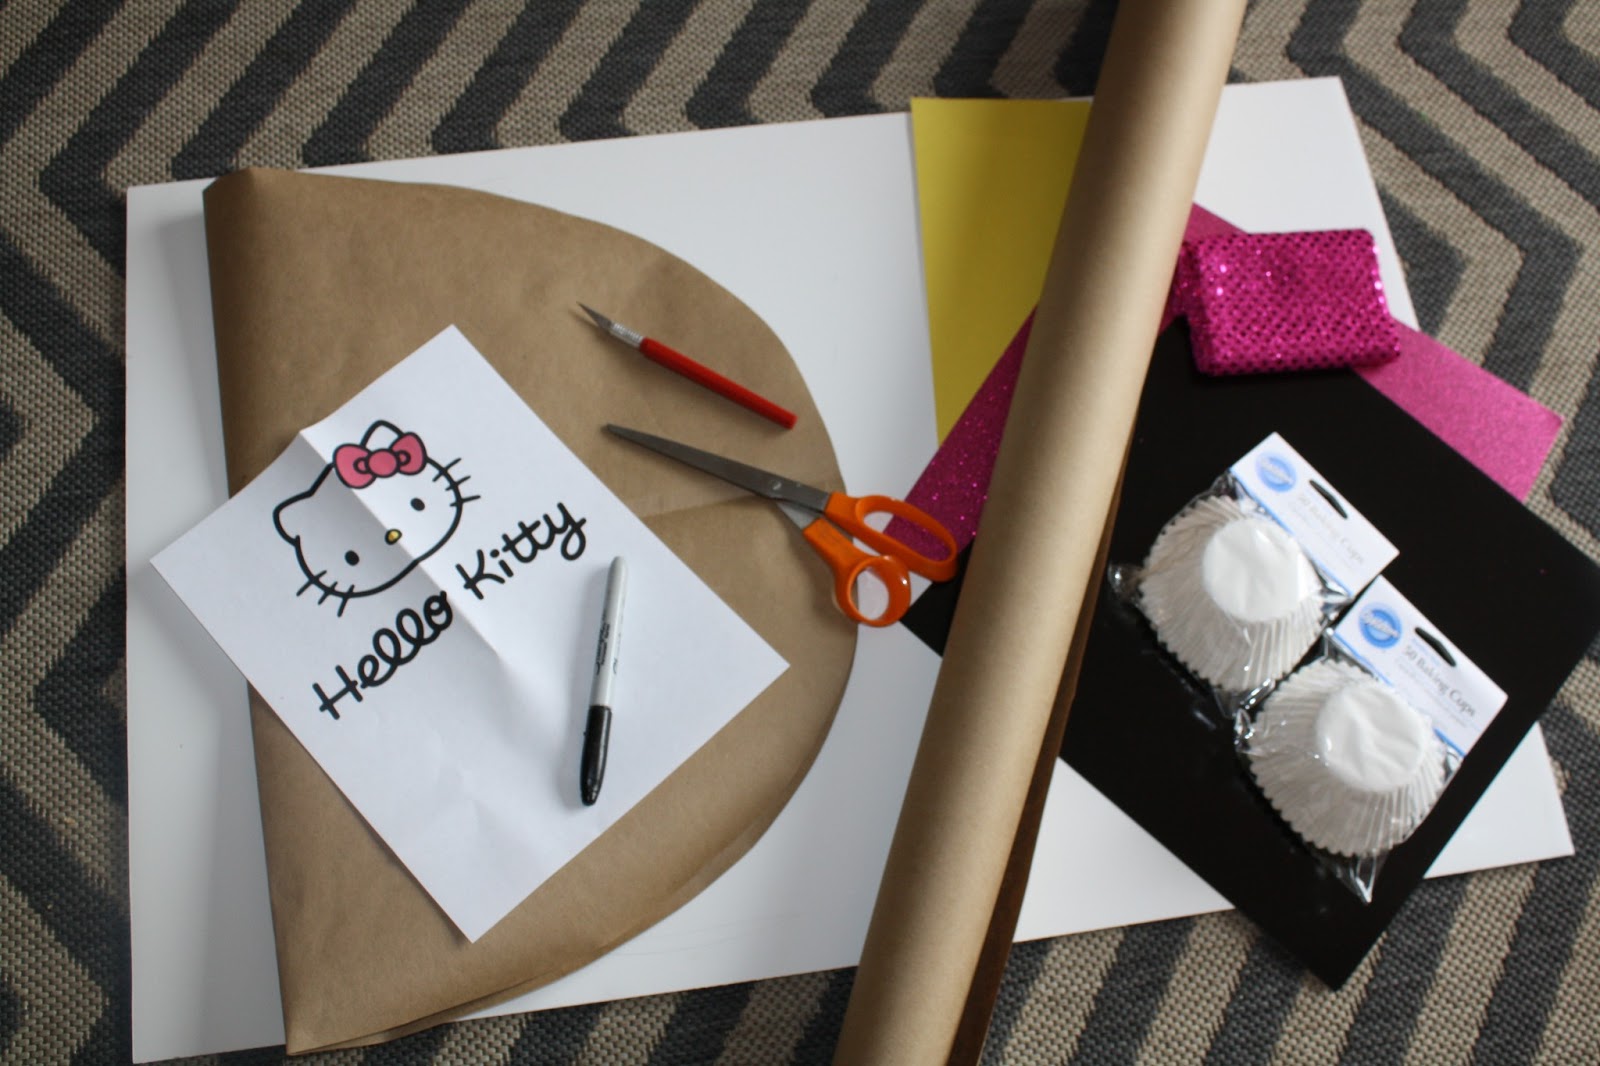
What You Will Need:
- An image of Hello Kitty (just Google Image it)
- 1 piece of white poster board
- Double Stick Tape
- Hot Glue Gun and a full pack of hot glue sticks
- A roll of Craft Paper
- Black and Yellow Construction Paper (I got a shiny kind from the scrapbook isle)
- 5 packs of LARGE cupcake liners (also known as baking cups- found at any craft store or Walmart for $1.50 a pack)
*You can also use coffee filters if you're in a time crunch, it just won't look as condensed*
- Scissors
- Marker
- X-acto Knife
- 1 piece of Glittery Pink/Red Scrapbook Card Stock OR 1/8" yard of Glittery Pink/Red fabric for the bow
- A small amount (2 hand fulls max) of Batting
- Black Pipe Cleaners
- 1 piece of Black Felt
- Fishing Line
1.) Creating a face stencil... Start by folding in half a piece of craft paper that's a little bigger than the poster board. Trace a half oval as big as the size of poster board will allow (I marked the poster board size on my craft paper at both the height and width to help me see how big I could go.) Cut it out in half so that it's symmetrical of both sides.

2.) Cutting the face out... Double Stick Tape the HK face stencil you've just created to the poster board and use a marker to trace it on. With a new blade on your X-Acto knife, cut it out carefully watching to not cut off your thumb- it happens, trust me. The cut doesn't need to be exactly perfect because the edges will eventually be totally covered with muffin tins.

3.) Making the ear stencils... There will be 4 corners of poster board left over to create the ears- you will only need 2 of them (the bigger ones if there is a difference). Again use your craft paper to stencil out the ears. I am NOT an artist and I did about 4 different ear stencils until I got the right size and shape. Again stencil these on to the poster board and cut out with your X-Acto.


4.) Ear placement... This is rather important in order for it to look the most like HK. So use regular tape to attach the ears to the back before committing with the glue gun. Make sure they have the same cut as where they're going on the head so that you can attach them seamlessly to the head without gluing them to the front or back of the face. It's better if it's one flat surface- see this pic.

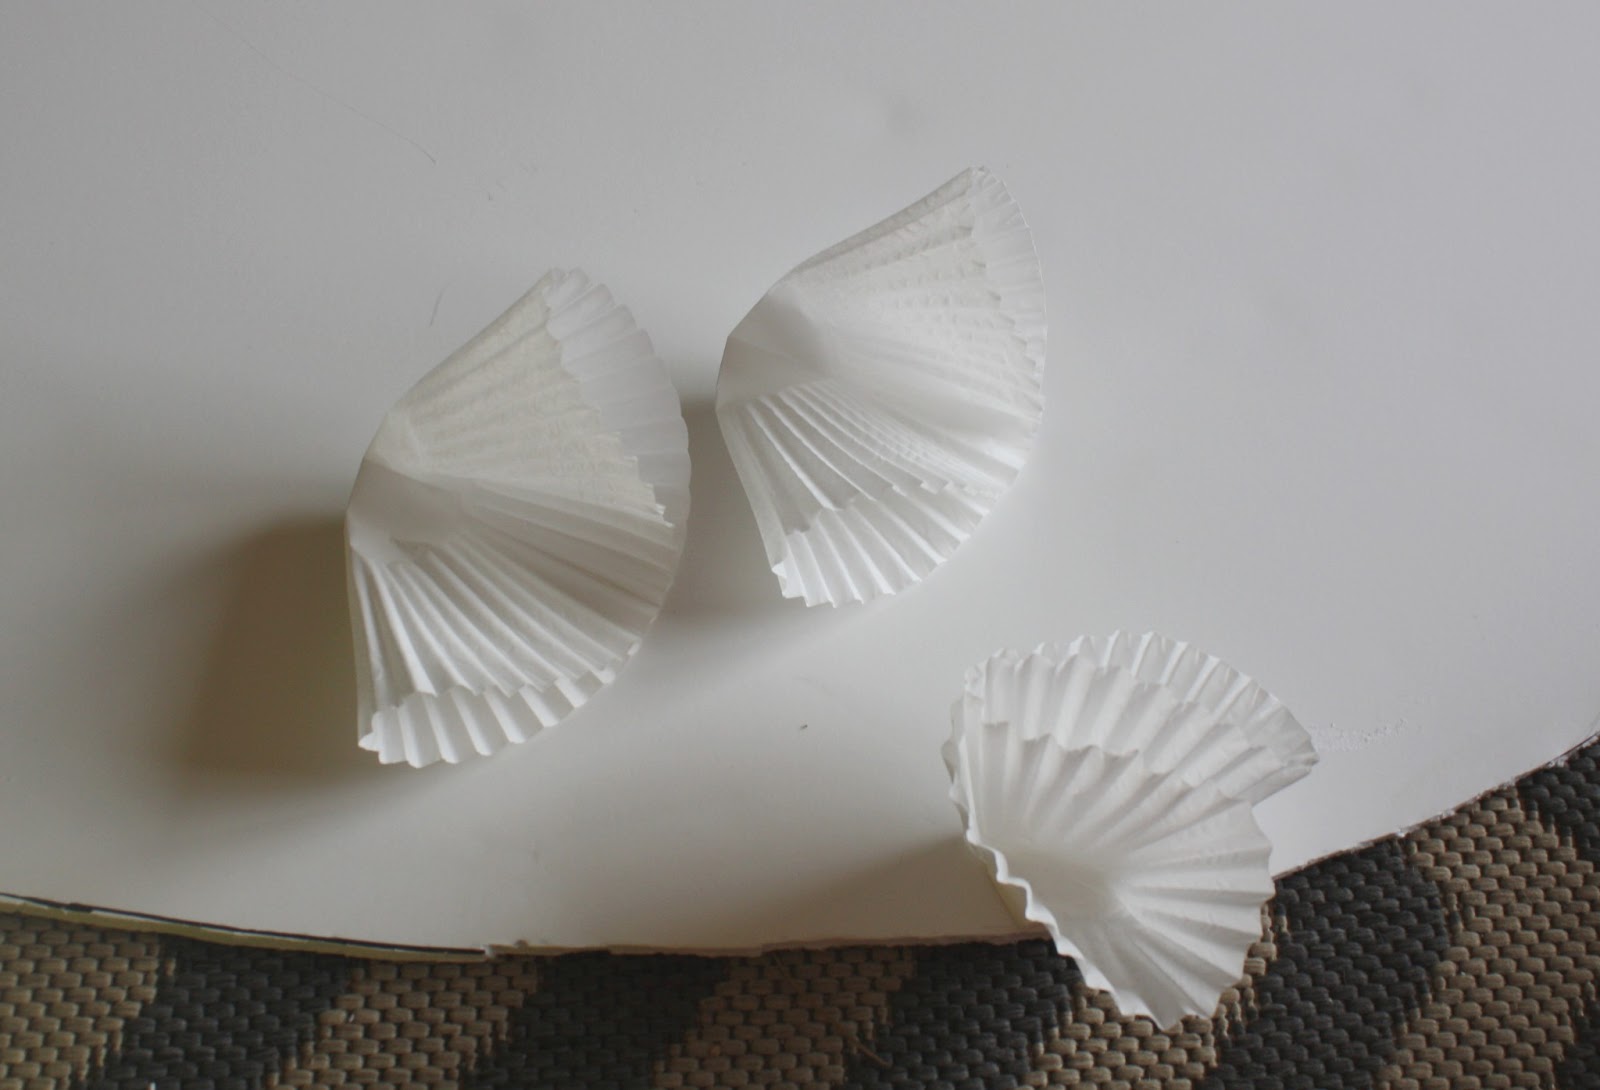
5.) Let's give her a face... One question!? Are you ready to potentially lose your mind due to some very tedious work?! Let's get to work then! Here are a few notes before we get started... {{helpful hint, do this project without toddlers since the tins are delicate- you might want to put in a movie or watch a marathon of your fave show to pass the time!}}
#1: If you don't have at least 3 hours to commit to this part but still want to make it- you'll want to go the coffee filter route. I'm thinking you'll need about 200 filters, so probably 2 packs. They are bigger so they cover more space so it will probably take 1/2 the time. #2, I chose to fold each tin in 4 for this project BUT you can also choose to not fold them at all and glue the bottoms of the tins down on all over the entire face and ears and then fill each tin in with a folded (in 4) tin right in the middle of the full tin. I've done this with the "90" I'm picturing and it goes a bit quicker but gives a slightly different look. I was going for total coverage with the HK so the way I chose was I folded each liner in 4 and while it was still on my fingers I put the hot glue on the bottom and pushed it down. I did the entire outer edge, then moved to the center and went out to the edges again so that the tins were not leaning in one certain direction.


4.) Eye & Nose Stencils... Hours later when you're ready to kill me is when we're ready for the next step... Yippeeee! Take your craft paper and again make an eye stencil by folding a small piece of it in half and drawing a small oval to create the eyes and nose- they will all be the same shape. My oval measured about 1 & 3/4" wide x 1" tall. Stencil it on to the black paper and cut 2 out for the eyes. Do the same thing with the yellow for the nose. I was able to create the outer black edge of the nose freehand once I had the yellow glue sticked down to it, but if you don't have a steady scissors hand then create the same stencil slightly bigger by 1/16".
5.) It's BOW TIME! You can do your bow 2 ways. I chose to use fabric, but if you're better with paper then use some fun shimmer/glitter or sequin paper to make it special. If you do go the paper route, I'm sure you can Google Image the "Hello Kitty Bow" and scale it to size for the perfect stencil. For the fabric bow this is what I did- it involves your fingers and hot glue... so if you're sensitive to hot glue, use paper. Or if you're good at sewing, I'm sure you could sew one. (The "Party Cave" is so crammed right now I can't even get to my machine, which is why I chose to hot glue it!)
Start by cutting off 2" from the end of the strip of fabric, this piece will be used for the center. I folded the long edges over and hot glued them as if to "hem" them and then set that piece aside. Next, take the rest of your fabric and fold it so that both ends meet in the middle. Put a line of hot glue under each end and "scrunch" them together. It doesn't have to look perfect because it will be covered with the center strip of fabric you set aside. Once you have both sides scrunched, stuff them with batting. Now place hot glue on the open edges of the bow where batting is sticking out and "seal" them closed.

Get rid of any sharp "un-Hello-Kitty-like-bow-lines" with more hot glue. Just push the sharp edges down and to the back where no one will see them so the bow is fully rounded off.

Place the strip in the center of the bow with hot glue and tighten it in the back until it looks right, then add more hot glue to fasten it down.
6.) On to The Whiskers... I was planning to use only black pipe cleaners... but after seeing how it looked I decided against it. I looked a little TOO artsy craftsy for me...but if you like it- go for it, it'll still look unmistakably like HK.
I decided to cover the pipe cleaners with strips of black felt. I just kind of cut them in to strips, remembering the middle whiskers are shorter than the outer ones. I cut 4 long ones and 2 shorter ones. Then I hot glued a strip down the back and laid the pipe cleaner straight down it.

6.) Attaching the eyes, nose, bow and whiskers... We're almost there! Get out that HK image again and be sure to study it. I worked on placing the features for a good 5 minutes before committing with hot glue. Her eyes should start in the middle to lower half of the face- this is where a lot of people mess her face up when drawing or doing anything artsy with her. The eye ovals go vertical while the nose goes horizontal. All very important! Attach the whiskers next, highest one at the top of the eye and spaced 1" apart from there... Her bow should be right in the middle of the right ear. If you wanted a bigger bow than the one I made, I'd suggest getting 1/4" yard of the fabric.
7.) CONRATS! You're done! If you want to hang it, use your X-Acto knife punch 2 small holes through the ears and then run some fishing line through and hang it for all to see! This would also make for some adorable room decor if you have a true Hello Kitty Fan on your hands!
xo Party or Die xo
kenna
My daughter would love this. She's small obsessed with Hello Kitty.
ReplyDelete